Friday, February 25, 2011

Lacey Ballerina

PTI Blog Hop Challenge: Scallops. I started by lightly sanding my shrink plastic and stamping the ballerinas (LizzieAnne) with blackArchival Ink. Then I punched them out with the Giga Scalloped Oval Punch that PTI carries.
http://www.papertreyink.com/acc_punches_marvyscalloped.html
Next I colored them lightly with colored pencils. (Colors intensify as the shrink.)


Then I used my Crop-A-Dial to punch holes in the scallops to create the lace look, And a regular paper hole punch for the top where the necklace would go through. I followed the package instructions to shrink them


I cut srtips from a new pair of dance tights to make the strechy no clasp needed neclaces and looped that through hole




Duckie Bubbles

This weeks MIM challenge from PTI was to use Scor-Tape with glitter. My first thought was to make a cute pink and blue baby plaid. However I soon realized I was all out of tape. None to be found anywhere in my stash. So I wondered if there were another adhesive I had that would still allow me to play. While it's not Scor-Tape exactly, It is the same basic Idea. Using the MIM as inspiration, I pulled out my mini glue dots and laid strips of them across my blue cardstock letting the spacing on the roll create the pattern. Then I sprinkled them with the prisma glitter. They make wonderful glittered bubbles!
Next I punched a a circle where I wanted my duckie to show through. I stamped the duckie from Limitless Lables on white and used an edge punch to make the lacey edges and layered the bubbles over with foam dots. I mounted the piece onto my yellow card base and added the sentiment Welcome Baby.


Thursday, February 17, 2011

Hello Friend

This Make it Monday challenge card uses Green Thumb and a bow made from vellum with the sentiment. This one is pretty basic but I'm very happy with the outcome. I have a template from Deja Views that I got back in 2001 for making bows from paper. I wanted a pink bow so I sponged my vellum with Berry Sorbet. I stamped my sentiment on the tails of the bow and added bling to the center.


Sentimental Limbs

My second card for the vellum strip challenge has Out on a Limb seeing ink for the first time finally! I started with a soft sky blue background and stamped the branch in brown in several directions followed by the cute flowers in Snow White. (I like thed way this turned out so well I almost didn't want to put the vellum over it.) I stamped my sentiment in a dark green on the vellum, tore the lower edge for texture and sponged the edges. I attached the velum to the background by punching holes in both layers with my Crop-A-Dile and weaving the twill through.


Royal Celebration

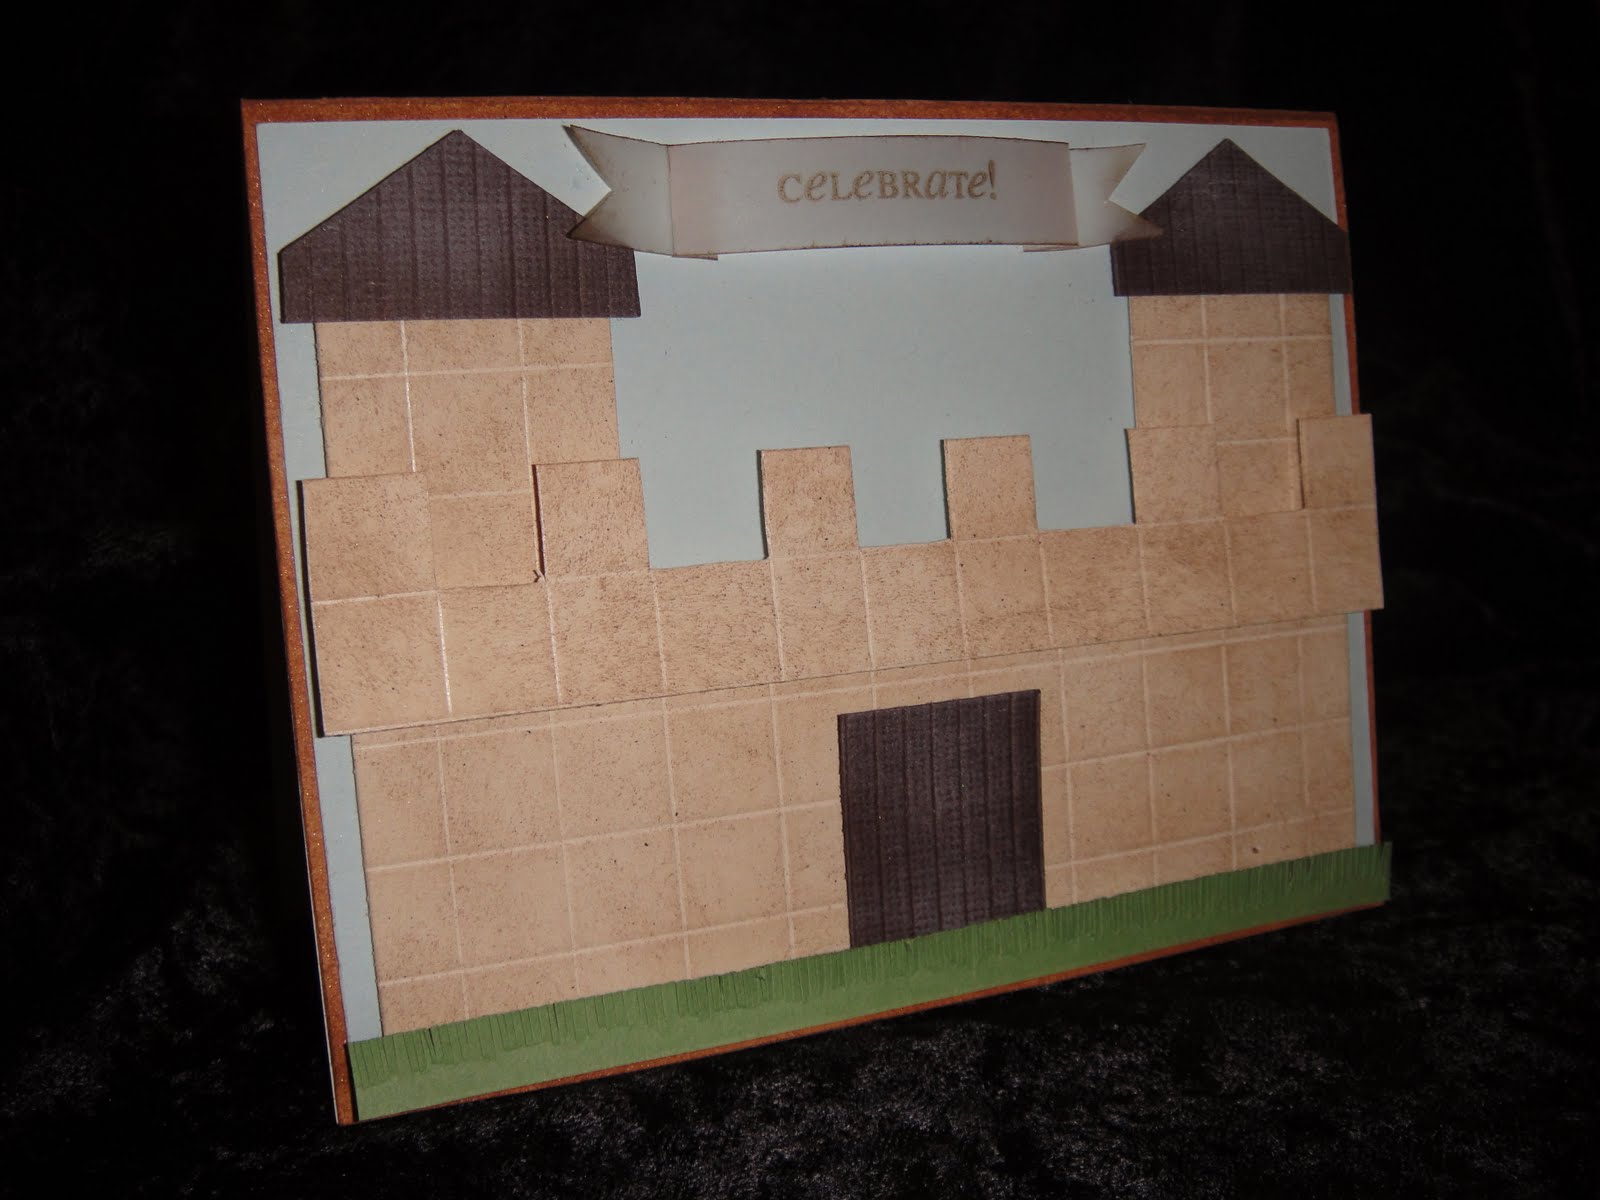
This weeks Make It Monday challenge from PTI was to use a vellum sentiment...I started with a light blue base for sky. I scored my vanilla cardstock and then sponged it fot the stone block. I used my score lines as a cutting guide for the balcony and to cut away between the towers. I scored lines across the brown and cut the tower roof pieces as well as the drawbridge. I cut a stip of green and made snips along one edged for grass. I stamped Celebrate from Little Lady on a vellum strip tucked in a fold on each end and V cut the ends to form the banner. I ran my ink cube along the edges to help it look finished. I tucked my glue behind the fold where it doesnt show through the double layer. Finally I mounted the piece onto a card base sprayed with Suede Glimmer Mist.


Friday, February 11, 2011

Rest~Relax~Enjoy

Here's another card inspired by the Make It Monday challenge. I Used PTI's Simple Alphabet to create my Relaxation themed sentiment. I was able to put all 3 words on my long clear block at once. I staggered the letters for a sort of Wave effect on the teal background. I left enough space between the words to go back and stamp the tiny flower from Heart Borders and Corners . I repeated this staggered across my sentiment piece. I tore a strip of kraft cardstock and layered it at the bottom of the teal as the sand.
(where better to rest, relax, and enjoy than under a palm tree near the beach, right?)

Below is a close up of my palm tree. I freehand cut the trunk after scoring my brown cardstock in a criss-cross pattern and tucked the lower end under the "sand". I used oval punches for the leaves, sponged with Burnt Umber ink (after folding and snipping a little). I glued them down letting a few stick up over the top of the brown card base. Last I added 3 stickles coconuts.


Wednesday, February 9, 2011

Joyful Sunflower

Can you tell I'm just in Love with this Make It Monday Idea from PTI? I can't stop playing with it! For my Joyful Sunflower I used Kraft and Summer Sunrise cardstock along with some wide celery green ribbon I already had on hand. First I cut my center circle and stamped several "Joy" stamps along with the stitches from Holiday Button Bits (the stitches at top and bottom, are hard to see in the photo) over it in several shades of brown and sponged the edge. Then I punched hearts from the sheet of Summer Sunrise and sponged those before layering in a circle along the edge of the back.
Then I cut a round card and made an outer layer of heart/petals on the top of it. I used foam dots to pop the top layer up a bit and allow me to tuck and glue my folded ribon leaves in between the petal layers (On the oposite diagonal as the sentiment)

Finally I trimmed just a tad off the bottom of the back of the card to help it stand up and keep it from rolling.
This one is my favorite so far!
And wouldn't it be cool done in reds for Christmas too?


Fairytales Continued

I Loved the Tink card from yesterday so much I decided to keep going. same fairytale theme. This time I used one of my Cinderella clippies as the embellisment. I also distressed my sentiment piece and layered it over a distessed page torn from a book my daughter didn't want anymore. I stamped some magical looking swirls at the corner to help balance it out. Instead of a hole to put the clippie through this time I just mounted my sentiment on foam dots giving just enough space to slide the back prongs of the clip under that layer.


Tuesday, February 8, 2011

PTI's Make It Monday Challenge

Playing along with PTI's new program: http://nicholeheady.typepad.com/capture_the_moment/2011/02/make-it-mondays.html I liked the card shown in the video So I kept her measurements and staggered stamping. I knew as soon as I saw it I wanted to put one of my ribbon fairies in the space to the right of the sentiment piece. With my embelishment being a fairy I wanted to use sentiments that all had a Fairytale theme


.
.
.
.
.
.
.
.
.
.
.
.
.
.
.
.
.
.
.
I decided it would be fun to leave Tink as a hairclip that the recipient could pull off and use. So, I made a slit in the space to the right to put the back of her clip through.

Tink could also be done as a magnet that could be pulled off if she needed to be more flat to mail (Or simply glued to the card...but I think Tink is too cute not to have a use beyond the card.)
:)
(P.S. to see more clippies check out my FB page: Cute C Me )

Tuesday, January 25, 2011

Wise Penguin

I decided to give the PTI BlogHop a go this time. I hope you like what I've done :)

The challenge this month was to use a set you either haven't used yet or one you hadn't used in a long time. (Sadly these projects are the only time Wise Owl has seen ink.)

I have a sweet boy who just really loves penguins. I had been thinking of trying to turn PTI's Wise Owl upside down to make it a penguin. I'm very happy with how well it worked!


I started with a base card of summer sunrise. Then I used the cute leaf motif in white ink to create my snowflakes on the black background. I used Simple Alphabet to put my sentiment on the Summer Sunrise ribbon. I stamped the large owl body from Wise Owl in white on Black CS Then I made a mask with the belly cut out and sponged his belly with the white ink. His eyes and beak were stamped on white and cut out and glued on. I stamped his feet directly onto my white square and glued down the body over them. I distressed the edges of the square before placing it over the ribbon onto my card.


While I was playing I decided to see if the smaller owl would fit on a domino ornament. :) It does.
I originally got this idea while I was bell ringing in front of JC Penney during the holidays. Their ad campain was "So many gifts, who knew?...Who who who." (with the h & o in red to read ho ho ho)
So I kept thinking the"who who who"
might be cute on an owl ornament.
I stamped him in Staz On and added the branch, Santa hat, & words freehand. I colored them in with BIC markers, spray sealed them and glued ribbon around for the hanger. All the Santa hats turned out just a littl different. But they are all so cute. (And my MIL has already requested one.)


:) See what else I'm up to on my Cute C Me Facebook pg:

Monday, November 1, 2010

Trick or Squeak!


This was the coolest "No-Sew" costume.

My son wanted to be Alvin from Alvin and the Chipmunks.
The hardest part was trying to find a hoodie without the zipper. I thought I was going to have to find one online to order.
Then, I stumbled across this hoodie at a church yard sale about 2 weeks ago
I cut a big "A" out of yello felt and hot glued it on.
One sheet of felt was the perfect size.
I cut faux fur into a tail hot glued brown felt to the underside to hide "ugly side" (but it never showed)
I pinned the tail on between the back pockets with 2 saftey pins from the inside before he put them on.
The ears were half circles, also cut fronm the fur and lined with the felt hot glued. I tri folded them and hot clued edges down. last I hot glued them onto hair clipies so they just cliped into his already shaggy hair (and he didn't have to wear a headband.)

And the Winner is...

#2 Teressa Thompson said...
Oh these are cute!

Please E-mail me at Lscrtr@yahoo.com
with the address you'd like "Tink" sent to :)

Saturday, October 30, 2010

Blog Candy Alert

Cat's Whiskers has blog candy here:

http://jacqui47.blogspot.com/2010/10/time-for-some-candy.html

A+ Teachers


Revisiting the tiny clipboard idea...
I made these for Nolan's 3 pre-k teachers, plus Megan and Ethan's multiple teachers. I found the cutest school themed Post-it style notepads in the Dollar spot at Target and decided they would be cute on the clipboards. I cut some to fit and stamped the "Teacher" (PTI) in black. The "A+" I did freehand with red pen.

P.S.~ Dont forget to Check out the Tink Blog Candy Here:

http://crafty-pirate.blogspot.com/2010/10/and-im-backagain.html

I'll draw a name on Halloween night (It might be kinda late, after trick-or-treating)

Thursday, October 28, 2010

Butterfly Thank You

My Sister-in-law had a butterfly themed baby shower this month so I made her some butterfly thank you notes and matching envelopes using PTI"s Butterfly Kisses stamp set.

It actually started with the envelolpes.
(Nana had the awesome idea to have everyone address an envelope and drop in a basket for the door prize drawing, then mom-to-be has all her thank you note envelopes pre-addressed for her.)
So I set out to make butterfly envelopes for everybody to fill out. Then I realized I should go ahead and make her the note cards to go in them too. I made 5 cards with each each large butterfly in the set.


(P.S.~ I have added a few new hair clips and pins to my Etsy store , http://www.etsy.com/shop/cuteCme
with more to come...check it out!)

Friday, October 1, 2010

And, I'm back...again.


Sorry, it's been so long, It's been crazy!

But, I have been in crafty mode recently. I have even decided to give and Etsy store a try.


So waht do you think?

How about some "Tink" blog candy to celebrate the kick off of my new adventure?

Share my store on your blog and leave me a comment. I'll draw a random winner on Oct. 31st!

Sunday, June 13, 2010

Long Time,.. No Blog

I haven't given up, I promise. Our computer overheated and blew. One day long long ago as I was walking by the computer area on the way to the laundry room I hear this weird "Pffft" sound from the direction of the computer. Over I go to check it out and it smells like burning rubber. (Not Good.) Hubby took it apart and did the trouble-shooting. (Turns out the fan died and the the board overheated.) And he ordered the new parts...
Today, it still sits in pieces...in a new location in a different state. (Yes, he packed and moved it like that.)
We used a tiny laptop for a while but it had no way of uploading photos.
After staying with the in-laws (who were without computer or internet sevice of their own) for a few months and then finally getting an apartment and getting somewhat settled, the replacement computer is set up.
So, I guess I'll give this another go.

Friday, July 25, 2008

Fun Fireworks - (Better Late than Never)

For the 4th of July we went down to Nashville.
(And yes, I'm just now getting around to posting about it... Better late than never, right?) The plan was to have dinner at the Hard Rock Cafe and then see the Fireworks.Well, the Hard Rock had a 3hr wait and was no longer taking names. So, we grabbed a slice at a pizza joint and by the time we were done the waterfront was looking pretty crowded already.So, we claimed our spot and waited...and waited, and waited... The Kids made friends with the kids in the group next to us, who invited them to share a seat on their Spiderman blanket. (Which was awesome, cause we totally forgot to take any chairs or blankets... Luckily, we did take the double stroller. The boys ended up standing on the flattened seats, with us holding on to them, to see over the crowd.)Finally, the Fireworks started. Kaitlan, (18 mos.) didn't cry at all. She just said "wow" over and over.It was Ethan who was the first one in our area to notice what the pink shaped firework was supposed to be."It's a Butterfly!" he screamed each time there was one.
There was one firework like we had never seen before. It exploded just like all the others. but as the lines faded away, it left string of multicolored twinkles that seemed to hover there before slowly floating down. Absolutely magical! (It turns out these strings of fireworks exploded out on tiny parachutes.) They were too cool!(and my picture just doesn't do them justice, but you get the idea.) Nashville sure puts on an awesome display.


" Butterfly" &

" Parachutes"