Saturday, April 30, 2011

Ladybug Spots and Lines

For this idea I wanted to try the line frame in a circle. I used my Colluzle to cut a circle one size in from the white circle I cut for my Little Lady ladybug. I stamped the ladybug and sentiment and then used a Zig Millenium pen .005 and traced around the smaller circle that I had laid in the center, careful not to hit the ladybug. I added the black dots the the ends of my frame to sort of fnish it off (plus it kinda goes with the ladybug spots.) I used a gel pen to highlight the ladybugs spots. I stamped the smallest flower from the set randomly in black on a Pure Poppy strip and added white gel pen to the centers and mounted the strip on the lower portion of my black card base. I offset my ladybug circle over that. (I love how this worked out.)


Before I realized my Millenium pen would do so well, I tried it with red. But I didn't like the uneveness. So then I decided to try the "messy on purpose" approach. Better but I still like the solid black line much more. :)


I made a few of them on round note cards to go along with the spots theme.


Line Frame in Black and White

This week's make it Monday challenge from PTI was to create a broken line frame. I wanted to try it another color other than black (as shown in the video). So I used my PTI anniversary set from a couple of years ago and stamped on black cardfront with Fresh Snow ink. Then using the directions from the video I made my frame with white gel pen. Last I mounted it on a basic white card base to keep the whole card in the black and white theme.

Sunday, February 27, 2011

Sparkling Rose

Well, I finally found some tape. I tore strips and pressed it into my tray of pink glitter. Then I peeled the backing and pressed the other side into the glitter so that both sides of the tape sparkle.
I looped the glittered tape to make my rose petals. I layered the petals on the back of my punched circle. I added a flower button to the center.
On my black card base I ran a piece tape across near the top and sprinkled it with the prisma glitter. (Kind of a neat effect on the black background.) I adheared the rose along the center of my glitter stip and embelished with a few leaf punches.
Finally, I stamped the sentiment from Green Thumb onto a piece of white cardstock and and edged with Spring Moss ink before using my Tim Holtz tool to distress the edges a bit and centered it under the rose.


Friday, February 25, 2011

Lacey Ballerina

PTI Blog Hop Challenge: Scallops. I started by lightly sanding my shrink plastic and stamping the ballerinas (LizzieAnne) with blackArchival Ink. Then I punched them out with the Giga Scalloped Oval Punch that PTI carries.
http://www.papertreyink.com/acc_punches_marvyscalloped.html
Next I colored them lightly with colored pencils. (Colors intensify as the shrink.)


Then I used my Crop-A-Dial to punch holes in the scallops to create the lace look, And a regular paper hole punch for the top where the necklace would go through. I followed the package instructions to shrink them


I cut srtips from a new pair of dance tights to make the strechy no clasp needed neclaces and looped that through hole


Duckie Bubbles

This weeks MIM challenge from PTI was to use Scor-Tape with glitter. My first thought was to make a cute pink and blue baby plaid. However I soon realized I was all out of tape. None to be found anywhere in my stash. So I wondered if there were another adhesive I had that would still allow me to play. While it's not Scor-Tape exactly, It is the same basic Idea. Using the MIM as inspiration, I pulled out my mini glue dots and laid strips of them across my blue cardstock letting the spacing on the roll create the pattern. Then I sprinkled them with the prisma glitter. They make wonderful glittered bubbles!
Next I punched a a circle where I wanted my duckie to show through. I stamped the duckie from Limitless Lables on white and used an edge punch to make the lacey edges and layered the bubbles over with foam dots. I mounted the piece onto my yellow card base and added the sentiment Welcome Baby.


Thursday, February 17, 2011

Hello Friend

This Make it Monday challenge card uses Green Thumb and a bow made from vellum with the sentiment. This one is pretty basic but I'm very happy with the outcome. I have a template from Deja Views that I got back in 2001 for making bows from paper. I wanted a pink bow so I sponged my vellum with Berry Sorbet. I stamped my sentiment on the tails of the bow and added bling to the center.


Sentimental Limbs

My second card for the vellum strip challenge has Out on a Limb seeing ink for the first time finally! I started with a soft sky blue background and stamped the branch in brown in several directions followed by the cute flowers in Snow White. (I like thed way this turned out so well I almost didn't want to put the vellum over it.) I stamped my sentiment in a dark green on the vellum, tore the lower edge for texture and sponged the edges. I attached the velum to the background by punching holes in both layers with my Crop-A-Dile and weaving the twill through.


Royal Celebration

This weeks Make It Monday challenge from PTI was to use a vellum sentiment...I started with a light blue base for sky. I scored my vanilla cardstock and then sponged it fot the stone block. I used my score lines as a cutting guide for the balcony and to cut away between the towers. I scored lines across the brown and cut the tower roof pieces as well as the drawbridge. I cut a stip of green and made snips along one edged for grass. I stamped Celebrate from Little Lady on a vellum strip tucked in a fold on each end and V cut the ends to form the banner. I ran my ink cube along the edges to help it look finished. I tucked my glue behind the fold where it doesnt show through the double layer. Finally I mounted the piece onto a card base sprayed with Suede Glimmer Mist.


Friday, February 11, 2011

Rest~Relax~Enjoy

Here's another card inspired by the Make It Monday challenge. I Used PTI's Simple Alphabet to create my Relaxation themed sentiment. I was able to put all 3 words on my long clear block at once. I staggered the letters for a sort of Wave effect on the teal background. I left enough space between the words to go back and stamp the tiny flower from Heart Borders and Corners . I repeated this staggered across my sentiment piece. I tore a strip of kraft cardstock and layered it at the bottom of the teal as the sand.
(where better to rest, relax, and enjoy than under a palm tree near the beach, right?)

Below is a close up of my palm tree. I freehand cut the trunk after scoring my brown cardstock in a criss-cross pattern and tucked the lower end under the "sand". I used oval punches for the leaves, sponged with Burnt Umber ink (after folding and snipping a little). I glued them down letting a few stick up over the top of the brown card base. Last I added 3 stickles coconuts.


Wednesday, February 9, 2011

Joyful Sunflower

Can you tell I'm just in Love with this Make It Monday Idea from PTI? I can't stop playing with it! For my Joyful Sunflower I used Kraft and Summer Sunrise cardstock along with some wide celery green ribbon I already had on hand. First I cut my center circle and stamped several "Joy" stamps along with the stitches from Holiday Button Bits (the stitches at top and bottom, are hard to see in the photo) over it in several shades of brown and sponged the edge. Then I punched hearts from the sheet of Summer Sunrise and sponged those before layering in a circle along the edge of the back.
Then I cut a round card and made an outer layer of heart/petals on the top of it. I used foam dots to pop the top layer up a bit and allow me to tuck and glue my folded ribon leaves in between the petal layers (On the oposite diagonal as the sentiment)

Finally I trimmed just a tad off the bottom of the back of the card to help it stand up and keep it from rolling.
This one is my favorite so far!
And wouldn't it be cool done in reds for Christmas too?


Fairytales Continued

I Loved the Tink card from yesterday so much I decided to keep going. same fairytale theme. This time I used one of my Cinderella clippies as the embellisment. I also distressed my sentiment piece and layered it over a distessed page torn from a book my daughter didn't want anymore. I stamped some magical looking swirls at the corner to help balance it out. Instead of a hole to put the clippie through this time I just mounted my sentiment on foam dots giving just enough space to slide the back prongs of the clip under that layer.


Tuesday, February 8, 2011

PTI's Make It Monday Challenge

Playing along with PTI's new program: http://nicholeheady.typepad.com/capture_the_moment/2011/02/make-it-mondays.html I liked the card shown in the video So I kept her measurements and staggered stamping. I knew as soon as I saw it I wanted to put one of my ribbon fairies in the space to the right of the sentiment piece. With my embelishment being a fairy I wanted to use sentiments that all had a Fairytale theme


.
.
.
.
.
.
.
.
.
.
.
.
.
.
.
.
.
.
.
I decided it would be fun to leave Tink as a hairclip that the recipient could pull off and use. So, I made a slit in the space to the right to put the back of her clip through.

Tink could also be done as a magnet that could be pulled off if she needed to be more flat to mail (Or simply glued to the card...but I think Tink is too cute not to have a use beyond the card.)
:)
(P.S. to see more clippies check out my FB page: Cute C Me )

Tuesday, January 25, 2011

Wise Penguin

I decided to give the PTI BlogHop a go this time. I hope you like what I've done :)

The challenge this month was to use a set you either haven't used yet or one you hadn't used in a long time. (Sadly these projects are the only time Wise Owl has seen ink.)

I have a sweet boy who just really loves penguins. I had been thinking of trying to turn PTI's Wise Owl upside down to make it a penguin. I'm very happy with how well it worked!


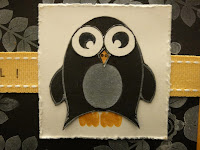
I started with a base card of summer sunrise. Then I used the cute leaf motif in white ink to create my snowflakes on the black background. I used Simple Alphabet to put my sentiment on the Summer Sunrise ribbon. I stamped the large owl body from Wise Owl in white on Black CS Then I made a mask with the belly cut out and sponged his belly with the white ink. His eyes and beak were stamped on white and cut out and glued on. I stamped his feet directly onto my white square and glued down the body over them. I distressed the edges of the square before placing it over the ribbon onto my card.


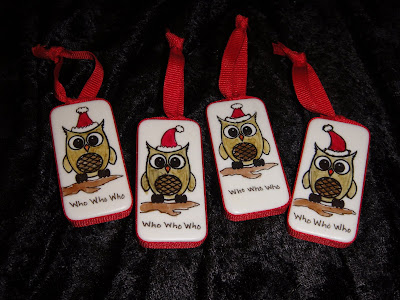
While I was playing I decided to see if the smaller owl would fit on a domino ornament. :) It does.
I originally got this idea while I was bell ringing in front of JC Penney during the holidays. Their ad campain was "So many gifts, who knew?...Who who who." (with the h & o in red to read ho ho ho)
So I kept thinking the"who who who"
might be cute on an owl ornament.
I stamped him in Staz On and added the branch, Santa hat, & words freehand. I colored them in with BIC markers, spray sealed them and glued ribbon around for the hanger. All the Santa hats turned out just a littl different. But they are all so cute. (And my MIL has already requested one.)


:) See what else I'm up to on my Cute C Me Facebook pg: